How-To Embroider Steampunk Cogs And Gears Onto Fabric
A while ago, I decided to have a go at embroidering cogs onto fabric, my aim being to add them to the hem of a skirt. I had never embroidered before, so while I’m no expert, I can tell you how I went about embroidering the cogs, should you wish to have a go yourself.
- Materials:

You will need:
- Fabric on which to embroider. A pillowcase is a cheap practice piece, but don’t go for anything stretchy or you may end up crying with frustration.
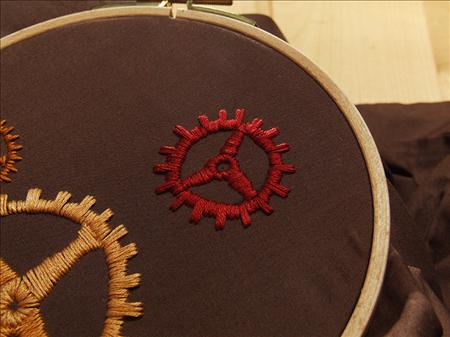
- Embroidery thread. I went for dark red this time, but for cogs I generally like shades of brown and gold.
- Embroidery ring. These are very cheap in craft shops, and usually wherever you can find the thread. I like the wooden ones and this one is just small (6.5″ or so).
- A needle. I went for this pack of needles and chose the smallest one because the fabric is tightly woven.
- Scissors for cutting the thread.
- A pen to draw your outline with – despite the image above, don’t try a ballpoint, go for a felt tip or gel instead.
- Something small and circular to draw around (or a pair of compasses) – I chose a tuppence. Do choose something small, as something 2p sized can take a couple of hours, but something teacup base sized will take the best part of a day!
- Prepare the Fabric.

Find where you want to put the cog, and place the embroidery hoop over that area. Tighten it up part way, then pull the fabric tight before tightening the hoop as much as you can with your hands. It wants to be like a little fabric drum, as far as I can tell.
Place your template (tuppence or equiv) on the fabric and draw around it with the pen.
- The Template.

Take the tuppence off, and gestimate the centre of the circle you’ve drawn. Put a tiny little dot there to keep you right (non-permanent pens good here). Next, draw a small circle around that – that will be the guide for the inner part of the cog. Lastly, decide how many spokes your cog will have – the smaller the cog, the fewer you can get away with. 3 looks good, 4 looks a little angular, and 5 is probably best reserved for larger cogs. Never done a 2, but I’m sure it’d look fine.
- Starting Off.

I start embroidering the cog from the middle – feed in from the back of the piece, and leave a couple of inches of thread at the back for safety. You’re going to be embroidering the little ring in the middle of the cog, and usually I feed from the back of the piece into the centremost part of the cog, and then stab back into the fabric from the outside of the ring. If that makes any sense at all.
Anyway – when you’ve done one stitch and you’re back at the wrong side of the fabric, try to ‘catch’ the couple of inches of thread you left at the back, so that when you tighten the thread, you’ll have trapped it between the stitches and the fabric.
- The Spokes of the Cog.

Once you’ve embroidered all the way around the little doughnut shape in the middle (your innermost stitches will be quite tight) you can move on to the spokes of the cog. Starting near the centre, decide on the thickness of your spoke and stab out very close to the inner doughnut shape – almost overlapping a tiny slice of the doughnut, in fact. This will keep the join between the inner and the spokes nice and tight.
When embroidering the spokes, try to keep them straight. I like to narrow the thickness of the spoke as it approaches the outer edge, with a quick flaring at the end. Just looks nicer, and with my clumsy stitches, is actually easier to do than perfectly uniform thicknesses.
- Cog Teeth.

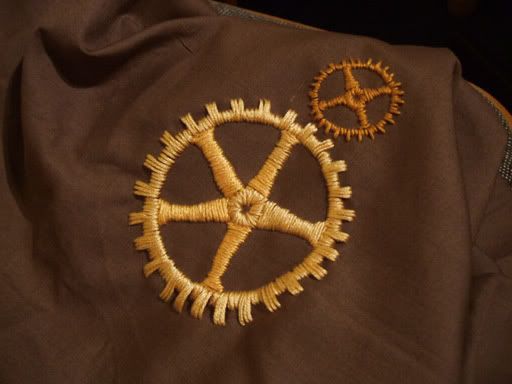
Once you’ve done all the spokes, you’re ready to do the edge of the cog. Decide on a ‘ratio’ now for your cog teeth. With this cog, I decided to do 3 short stitches and then 2 long stitches. You can see on the larger cog I did 4 short and 3 long. On my smallest cog, I did 2 shorts and 1 long. Generally, do a little more short than long, but you can vary it a bit. Just stay consistant on a cog.
- Finished!

When you get to the end, and you’re approaching your starting point, pay close attention to how many more cog teeth you can fit in – try to estimate if you should tighten up your stitches to fit one more tooth, or if you should loosen the stitches to stretch out that last tooth space. If there’s any spaces between your stitches later, you can generally just overstitch to fill the gap – it won’t be noticed from anything further than 2 feet away.
And there you go – one finished cog!


